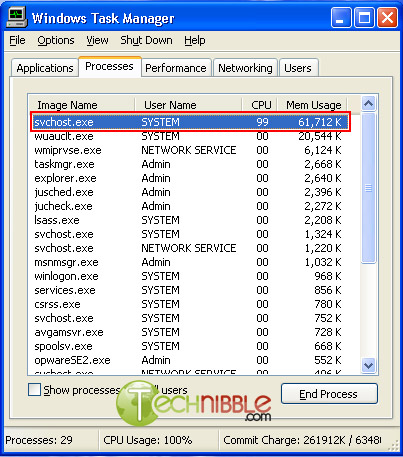
As a computer technician, here is a problem I have been coming across more and more. About 30secs to 1 minute after booting into Windows the computer starts lagging heavily. When CTRL+ALT+DEL is pressed it shows that svchost.exe is using up maximum CPU resources and only occurs when Automatic Updates is enabled. Microsoft has recognized this problem and has released a patch. However, on all computers I have worked on with this problem, the Microsoft patches don’t fix the problem. This is a guide on how to fix this problem with svchost using maximum CPU.
First of all, to identify if you have this problem you need to press CTRL+ALT+DEL all at the same time, go to the “Processes Tab” and then press “Mem Usage”. If you have this svchost.exe memory leak bug after about 1 minute you will see that the amount of memory usage svchost.exe uses will keep increasing until CPU becomes 99 or 100%. Below is an example of what this looks like:

How to stop svchost.exe using up 100% system resources (Windows XP Only):
- Visit the Microsoft website and Download Windows Update v3 WindowsUpdateAgent30-x86.exe and save it to your C:\ drive
- Download this file fix_svchost.bat (right click and choose save as..) and save it to your C:\ drive
- Download this file WindowsXP-KB927891.exe and save it to your C:\ drive
- Reboot the computer and log in to Windows XP in safe mode. To do this, press F8 just before the WindowsXP logo shows up during boot and press up to choose “Safe Mode”
- Once Windows has loaded and you have the option of which user account to use, log on as “Administrator”.
- Click Start > Run, choose the Browse button and find the fix_svchost.bat file you saved before, press Open, then OK.
- A black screen will pop up and white text will scroll past. Wait for this process to finish as it could take several minutes. It will close itself when its finished.
- Once the black screen disappears, Click Start > Run, choose the Browse button and find the WindowsUpdateAgent30-x86.exe file you saved before, press Open, then OK. Follow the prompts as it installs.
- When Windows Update Agent finishes installing, Click Start > Run, choose the Browse button and find the WindowsXP-KB927891.exe file you saved before, press Open, then OK. Follow the prompts as it installs.
- Reboot the computer


